How to Remove and Replace Manifolds & Risers/Elbows- MerCuiser
Your Content Goes Here
I’m going to go over some of the tools you will need to do this job.
So let’s do that and then let’s get to work on this.
TOOLS WE NEED
-The first tool you need is a 9/16 on a 3/4 inch ratchet . This is going to take off the nuts and Bolts on the elbow, and it also is going to help you with the manifold as well.
-11 mm socket with a quarter inch ratchet
-A screwdriver to loosen up all the boots, to take off the boots off and the hoses as well.
-And you may need some extension, so we have that too.
When it come the time to put it back on, we are going to have to clean it up, so we have a little
wheeze wheel, this is to clean the block.
-A gasket scraper.
-a torque socket as well.
-I’ve also got some glue. I’m going to put this in certain areas
-Gasket, from the manifold gaskets to raiser gaskets and then some extra plugs, that got to be put in once we get it off.
So you will need some more tools once we get it off the bench and I’ll explain that once we get to that point.
So right now let’s get these off and let’s get to work!
So come on board, let’s get this done.
Ok, guys, so I’ at my engine compartment and I’m going to get ready to start taking off the elbows, the risers and manifolds.
So, of course the first place I’m going to start is what’s really easy, taking off this first hose.
Ok, guys I took the hose off and now we’re going to have to take the linkage off.
I did forget to mention you’re going to need 11 mm socket with a quarter inch ratchet and there’s three bolts that hold it on one here, here and over here, just put you up your shifter in gear and this will push back for you so he can get this one that’s tucked in real near over here.
Now, I definitely didn’t blow something up so I don’t know what the sirens are for but it’s not for me! Thank God!
Okay so I’ll just push the linkage out of the way
Now the best place to get the boot off that is right down here, when it goes in because once you loosen this up you can slide it up. If you try to take it off over here it’s going to be difficult to pull it out; and especially to put it back in. So I’m going to loosen up these right over here, these hose clamps.
Now once those are loose, I’m going to go and take off the 9/16. Throw them over here, which is taken off the elbow. Ok that’s four. So now I’m taking off the elbow off.
That’s the first part to my puzzle.
Okay now to get the manifold off, there is four bolts. 1,2,3,4. Also have some hoses that connect to it. The issue is that I only have 2 hoses that connect so, I’m going to take those off.
Now a lot of times what I would do is I’ll take a picture of where is off with the camera to make sure I put the gaskets back on correctly and everything is done right, but in this case I know how it goes. You can see, that’s the old gasket and it would go on like this, so I don’t need to take a picture cuz I got filmed. All set!
Set the two hoses, hoses are on the bottom over here, a little hard to get to, specially with my piston in the way. Need my screwdriver and there is a little T back here.
Ok, I got one of the hoses off the other one I’m having a little bit of trouble with.
I put the screwdriver in there, I opened it up .
What I’m going to do is to take the manifold off and hope I can just pull it out from there.
So I’m going to start taking the manifolds bolts off, there are four of them.
You may need an extension depending on where yours are, mine are pretty much in clear view.
Ok, now I hope it comes out with the hose. Yeah should have tried to get the that off first, don’t be like me, That just pops off, you can tap it with a hammer and I’ll make it lighter too.
And here it is it’s. The manifold, now It’s not really that big of a job it’s just heavy and bulky which really sucks! and depending on how much room you have its going to make it easier or harder. So what I’m going to do right now, is I am going to bring this to the bench, but before I do.
I’m actually going to change my plugs because I’m here now, you can see them all. So, I’m going knock off the plugs real fast and I’m going to change the spark plug wires already did it to the other side and I’m going to do it to this side too as well.
Ok guys, I changed the plugs.
I’m just going to change the wires.
This a simple tune up stuff, but I’m just going to show you anyway .
Plugs are already in and we already have a video on that, wires is pretty much, you are going to take off the wire, one at a time and just match up the length, and that’s really it, and you just going to do that in times.
Make sure you get Marine wires so no spark flies out of it , and the boat won’t go on fire.
Okay guys I have the manifold off, I change my plugs like I said cuz it is easier to do it then and now I got to clean the gasket, the previous gasket that was on there .
So I’m just scraping it right now with a scraper and then I’m going to clean it with a whiz wheel he don’t have a whiz wheel. If you don’t have a whiz wheel you can just use some Amor all, that would be fine or try to use a razor blade to get everything off, but you want to make sure it’s cleaned good so you don’t have an exhaust leak when you start the boat up.
ok, that’s all nice and clean!
So, now we’re going to go to the bench and get to work on setting up the riser.
Cleaning up the riser and setting up the elbow and the manifold. So let’s go do that outside.
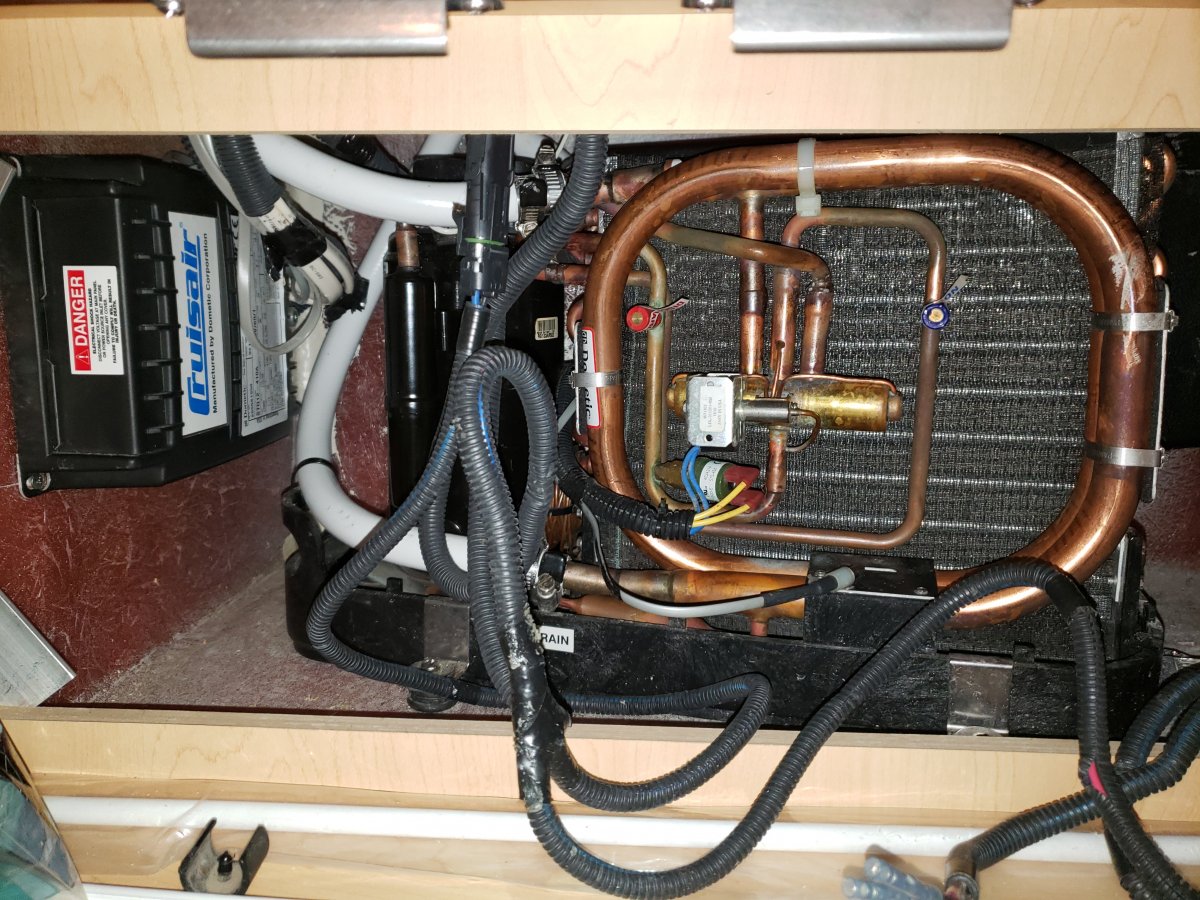
Ok, guys so I have the riser, on the bench right now and what I will be doing is cleaning the gaskets off and the ports too. Now, this basically what it does is transfer the coolant through the manifold to the Elbow.
So, we’re going to clean this up really good and use this again instead of buying it and then save some money.
And the way you got to clean it up is that you got to make sure that remains flat and that’s why I’m going to be using a block sander to go over like this making sure that it sands it down nice and even.
Once I scraped it all down, this side is scrapped down already. This side I’m going to scrape it with the scrappers and clean out the ports over here. I’m going to scrape off as much as I can of the gasket. Like that! got to be all cleaned up.
So I’m just taking it in and scrapping it around. Getting as much as I can though. Different scraper.
It looks pretty clean now.
I’m really, really cleaning it up now, by using the sander.
And I want to keep this flat so I don’t use the Wiz. I don’t want to make any kind of indentations of any kind. I want this to be totally flat.
Ok that’s pretty flat and nice and clean. So I’m just going to do the other side.
Ok, this is the elbow, basically I’m not going to be using anything from here so I don’t got to clean this but I do need to get this nipple off for the hoes, but I want you to see how it’s all closed up over here this is what happens , it gets all closed up and then the water can pass through and then your boat run hot.
See there is one of two ways:
My boat, was at an idle, it was running hot and when I drove it, it cooled down, so it was at off pressure at a high RPM, to push the water through; But not enough at a slow RPM, that was the manifold that was bad.
So I’m going to take this nipple off that’s the first thing and then we’ll take off these hoses. So, I do need 1inch /16 wrench.
This part you do need to use over, everything else you have new plugs and everything and you need to use the holes the two hoses on the bottom that was a pain to get off. That piece you need to take off too. Take this off over here, now it makes a good anchor.
Ok, going to take this one.
I’m not going to clean it or anything, so good for that.
It’s all good to go now.
So now can you put these parts back on.
Going to use some Teflon tape.
This was the extra stuff I didn’t mention when we were taking it off at the beginning.
I’m not going to tighten the clamp so I’m going to do that when I get it all set in there.
So this is all ready to go back in, so we got the riser, the elbow and now we have to take care of the manifold.
Come over here and once again you can see how the ports are closing up over here, that’s where the water runs through, we got to take off this little piece over here.
Now it’s not an easy task, so big channel locks, want to get this in the right position so I can pull down on it.
Big channel locks to get that.
So now we are going to get the other manifold.
Now, it goes in the middle of these two plugs on, and new replacement ones that we have on the new manifold. So I’m pretty much done with this.
Once again, you can use this as an anchor.
Now I’m going to be putting the plugs into the manifolds, there’s two plugs.
It’s a 9/16 allen key that you’re going to need for this.
Is one here, one here and there’s another one on the top, a little one. But we are going to get back to that in a second.
Ok, so I’m going to lay this down flat so I can get it tight. I’m just going to turn. Make it as tight as possible. I don’t need Teflon because it comes with the Teflon on there.
Ok. Then of course this one left that goes here, I’m going to need the allen key for that which is a 5/16 that’s all good I’m looking nice and I got my water jacket back in.
So that is pretty much for space in the front of the engine like that that’s the same direction. I want to get it in as close as possible.
Once again the big channel locks.
Now, I can get ready to put this all back together.
So I will get back on board.
Ok. I’m back in my motor compartment. I’m going to get ready to put my Risers back on, there are set pins that you can buy which makes it a lot easier.
I already did three of my manifolds without it so, I wasn’t going to go get it , so what I do is I put two bolts in, slide one out, put the gasket in slide the other one out with the gasket in, and put the two middle ones in.
So, time to get to work. Hope you have your muscles on.
Alright so here it is. Get the one pin in and a second bolt in.
Now, another good thing is to try to get the back one in first. That’s what I always do. All right getting that bottom hose, is a little difficult. So I try to get it on while is loose still.
Okay, see their both on. Those bottom ones are a little hard to get but I always get this one, when the manifolds aren’t bolted on and as soon as I get on like this, I put the second one over here.
So that’s good, And now you see I got some space in between and that’s where I’m going to slide the gasket.
Now what I’m going to do, is loosen up ( be careful with that) the front pulp. Get it on there and then get around to the back and slip it in.
So gaskets now set in there. Now I’m going to take the two middle bolts.
Put them in here, Tighten a little bit. Let’s start from the middle.
I got three torque specs, I got for the manifolds 15 /25 and 30. So, 15 is about hand tight, which I just did . Just Snug. Quick.
That’s 30. 30. So now that’s done!
I’m going to get ready to put on my riser and the elbow and make sure everything’s all good. That’s going to go like this. They do say to put some glue around it, so you can do it either way. Some people don’t do it at all but this brown mark glue is a type that you supposed to use and not the whole gasket, just around that part of it the circle ends. This goes in the front on the bottom, line up the best you can.
Ok, Your going to put it on the top now on this side and then, I’m going to go get the elbow. Put that on, First the gasket, on the dry joint. This is going to go up and this is in the front. Ok. Like that.
It’s a lot easier when you take the boot off, down there, cuz it kind of holds it. That’s 4 bolts and you can of wiggle everything in, make sure they are all in and you don’t strip them.
So, it’s 7 and 45 and tights probably a little more than 7 so you’ll be okay with that, we get the torque wrench. Set this to 45.
That’s 45. 45 , hear a click. That’s 45.
Ok, All the bolts tighten on the manifold and the elbow. So that’s all set.
I’m going to go tighten all the houses and put all the houses on.
And start with the front one and tighten the boot houses, the two bottom ones I didn’t tighten yet. Alright.
I hook the linkage back up, I got the electronic right there.
Get the linkage, from the background to here going to plug it in.
Ok! now I just go get this last one, get the ratchet all ready. 10mm, do it hand tight always.
That’s all good. So now there is one last thing to do which
I forgot to do it on the bench, it was the front plug, the elbow snug.
And then we are going to go get the ratchet. Now that’s all set.
Risers are all done, elbows, manifolds, fuel systems, done!
And then we are going to fire this baby up! And make sure everything is ok. And you are good to go. That’s about it.
So hope this helped you out.
Once again my name is Eddie and this is another edition of onboard. I’ll catch you next time !
Share this article

Written by : Dennise Marone
One Comment
Leave A Comment Cancel reply
This site uses Akismet to reduce spam. Learn how your comment data is processed.
Follow us
denissemarone@gmail.com
eddieue@gmail.com
Latest articles

April 2, 2025
April 2, 2025
April 2, 2025

April 2, 2025
Hi Mate, great videos,
I have a 4.3 2003 220 mercruiser, Sea Ray.
Engine serial
Im in Sydney, Australia – if this makes a difference.
I am having exactly the same symptoms as you here in this video.
I was hoping that you might direct me to buying the correct risers and manifolds.
Nipples, perhaps merc glue. If you can.
Many thanks,
Michael